")
Organizing an event, big or small, comes with a substantial to-do list and numerous responsibilities that can be pretty overwhelming. No matter what’s included in the event, you can expect the logistics of it to bring you a fair amount of challenges along the way.
Even if you’re an expert at planning events, there’s usually a team of people involved, and you can guarantee everyone stays on the same page with the help of OnePlan studio software. In this article, we’re going to focus on the 5 things you should do first in OnePlan so you can ensure you’re making the most out of the event planning platform.
What Is OnePlan?
If you’re looking for an all-in-one solution to help plan your events, OnePlan offers an intuitive solution that allows you to manage every step of the process within a detailed and fluid UI. It allows you to cooperate with every partner, supplier, and colleague associated with the event, and you can easily work together from the comfort of your computer. It comes with many event management and planning tools such as maps, infrastructure, CAD import, and much more. Whether you’re working with a small venue or a large arena, OnePlan is able to help you manage it all. We recommend starting your event plan with 5 steps to make sure you’re getting the most out of the platform and planning a great event.
1. Plot Areas, Routes, and How to Access
Plot Areas
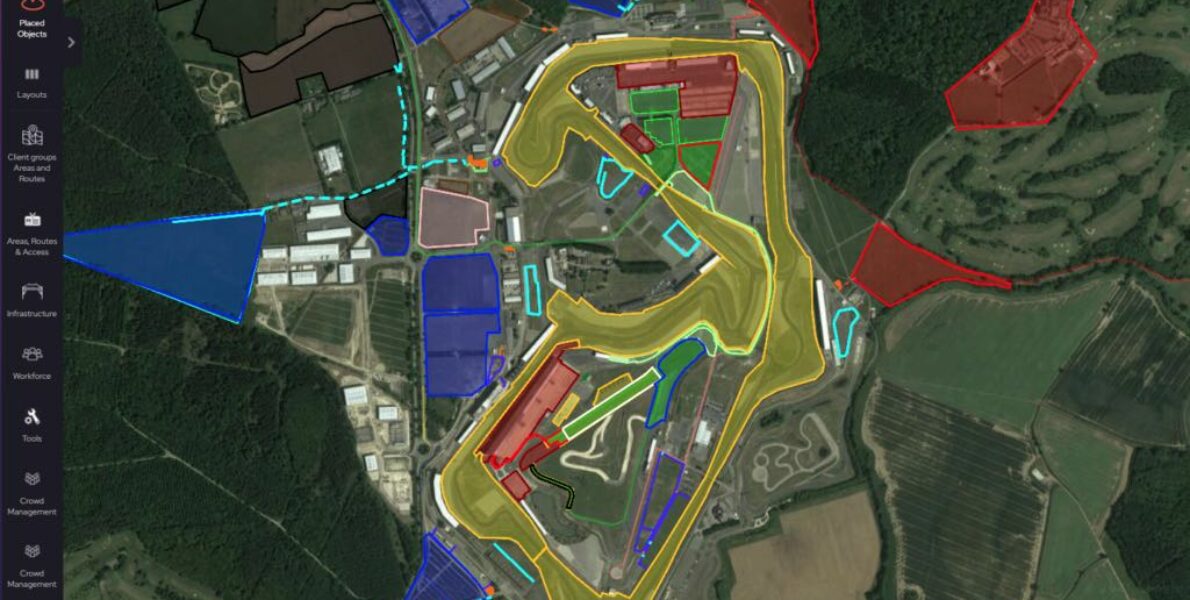
Once you’ve created your event in OnePlan, your dashboard will contain many different parameters that you can fill out at your own pace. For your event to flow smoothly, it’s vital you have an event plan that shows specifically marked areas, routes, and how your attendees will access each. We recommend your first step to be marking those areas, such as the area your entire event will be held in, crowd areas, food areas, etc.
To mark an area, click “Areas, Routes & Access” in the lefthand toolbar in the OnePlan Studio, then click “Areas” and choose a colored area you want to mark. Then plot the corners of your area, and double-click on the last point to finish marking off your area. Ta-da! You’ve plotted your first area in OnePlan.
Place Routes
It’s undeniable that mapping out the infrastructure of your event from multiple angles ahead of time is crucial, but you’ll also need to consider how attendees arrive and enter the event. Many people won’t want to wait too long if lines are backed up just to get in, and OnePlan is an excellent tool to route parking and entrances alike.
So your next step is to plot your routes. How will your guests access your event? What will their route be from parking or public transit to your entrance? OnePlan offers vehicle and pedestrian routes.
To plot routes on your event plan, open the “Areas, Routes, & Access” tab again in your OnePlan studio, then choose the route you’d like to plot, then easily click where you’d like to route to start, follow and stop.
Measure Areas and Routes
Alongside plotting these routes and areas, you’re also able to gather accurate measurements for the venue, vendors, and where you expect to have consistent foot traffic. Getting proper measurements of the area you’re working with is vital for your vendors and the expected capacity for your event. Knowing the exact amount of area you have can help with crowd control and just helps minimize the attendee’s wait time and avoid crowded areas.
To measure your areas, simply click on an area you’ve plotted and you’ll see the exact meters squared (or feet squared) of the space. OnePlan also gives you an estimate of how many people fit inside that space and that number will vary based on the crowd density you’d like at your event.
To measure your route, click on your route and you’ll see OnePlan automatically calculates the length of that route. You’ll also see the travel time of either walking or driving that route based on an average speed you input.
Once you’ve gathered all the measurements you might need, you can easily share this data with anyone who needs it. This ensures that everyone involved knows what to expect. It’s also helpful for the security of the event as police, fire rescue, and medical teams will be able to provide a swift response if needed.
In OnePlan, you can work on these parameters in real time with your partners and colleagues, allowing you to brainstorm every step of the way. OnePlan also lets you model crowd flow which gives you a reference for what foot traffic will look like from all angles. Not only will people appreciate your efforts towards crowd control, but it’ll ensure your event progresses without delay.
2. Place Infrastructure
An event is nothing without its infrastructure and to be fully prepared, your event plan must be detailed and precise with the right infrastructure in place. In OnePlan, there are hundreds of infrastructure items from tents to lighting to food and beverage to sanitation. Your next step in OnePlan should be to plot infrastructure onto your event plan and give each item an exact location.
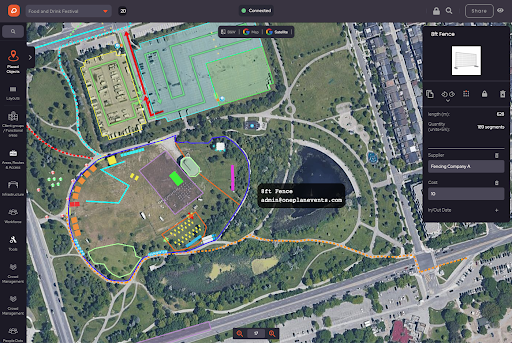
To plot infrastructure, click on the “Infrastructure” tab in the lefthand menu, from there you’ll see many drop-down menus of each of the infrastructure items OnePlan offers.
One of the most important infrastructure items plotted onto your map is fencing. Depending on the location, some events will require fencing, so attendees don’t get lost or misdirected. Depending on the scale of your event, it can become fairly chaotic if you’re expecting a large number of visitors. If the event is left too open, it can lead to a substantial amount of disorganization among the crowds of people whose curiosity drives them from one vendor or attraction to the next.
OnePlan allows you to map all of the fencing you might need and how to properly incorporate it within the space you’re given. Moreover, it’ll give you the data for the number of required panels, making ordering and reserving these resources all the more efficient. OnePlan offers many different types of fencing inside the studio. There are crowd barriers of varying lengths, Heras/permiter fencing, tensa barriers, bollards, mojo barriers, and more.
To plot fencing onto your event plan, click on the “Infrastructure” tab, then click on the “Barriers/Fencing” drop-down menu, and choose the fencing you’d like for your event. Then click the start location of your fence, click on each corner and double-click to finish and place your fencing.
3. Add Specific Tools for Your Event
Among the hundreds of items and tools OnePlan offers you’ll find unique items that are designed for your specific event. With previous event planning methods or software, not having custom or specialized items allows for error. Maybe you don’t know exactly how big a ferris wheel would fit on your event map or the time it takes to set up an ice skating rink. Maybe the item you need is a specific barrier designed to protect crowds in high-speed cycling events or the wicket for a cricket game.
OnePlan has Specialty Event Packs with items designed for specific events. Some of the specialty event types we provide items for are running, cycling, cricket, triathlon, fairs and shows, and Christmas markets.

To access specialty event packs, click the “More” tab in the left-hand menu. There you’ll find a drop-down of the different event type packs.
4. Plan Your Workforce

With any event, you’ll need a workforce you can rely on, and they need proper organization to perform their designated jobs effectively. As you map out your event in OnePlan, your next step should be to dot plan your workforce for the event and where they’ll be located. OnePlan has many different workforce options including medical, police, security, staff, volunteers, and more. You can provide names for each department and even include signs, tents, vehicles, sanitation stations, and many other parameters that pertain to the workforce for the event.
To plot your workforce on your map, click the “Workforce” tab on the lefthand menu. There you’ll see the many options of workforce dots. Click the workforce type you need, and plot their location where they’ll be located during your event.
If you need to reduce or enlarge, the size of your workforce. Click on the workforce dot that was plotted and select the scale. You can easily plan to scale among your other measurements, and the software provides multiple views of your event, such as satellite and aerial imagery that offers details of your event in high definition. Once again, all of these features can be managed with a collaborative effort, so nothing gets missed in the event planning process.
Although attendees are primarily there for the vendors and attractions, a workforce that operates fluidly is vital for any event as they are a big part of keeping the event in order and on schedule. To help keep the workforce on track, give them view-only access to your plan so everyone knows where they are supposed to be throughout each stage of the event.
5. Share Your Event Plan
Collaboration is key when planning! That’s really what makes the big difference when planning in OnePlan. Using OnePlan for planning, you can communicate your plan visually and collaborate with all key team members and stakeholders. Maintain an overview of the entire operational site plan and share it with local authorities and emergency services so they can provide the permits and support you need. As well, it’s cloud-based and easily shared in one button meaning collaboration is easy and everyone will always be able to access the latest version of your plan.
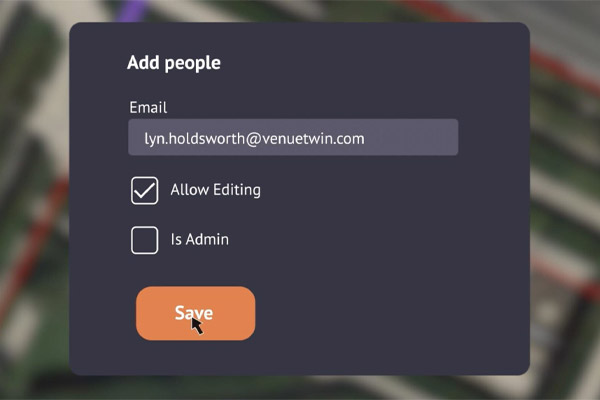
To share your event plan, click the “Share” button in the top righthand corner. You’ll then be prompted to a page where it asks for the email address of person you’d like to share your event plan with. You then decide whether you’d like this person to be an editor, admin, or only have view-only access of your plan. For your event planning team or collaborators, we suggest admin and edit-access. For stakeholders, vendors, and suppliers, they might only need view-only access to keep updated on your planning.
By now, you’re on your way to a successful event! You’ve defined your areas and routes, you’ve defined clear entrance and exit points, you’ve added specific tools your event needs, you’ve plotted your workforce and you’ve shared your plan with important stakeholders. There’s so much that goes into planning a successful event and we’re here to help you on your journey. Our Professional Plan allows administrative support and full-on customer onboarding so our event planning experts can help you each step of the way. Feel free to book a demo with our experts to start planning better with OnePlan. Happy planning!